Wonder what hairstyles will look like in 2012? To know it’s important to keep up with the trendsetters, celebrities like Megan Fox, Carrie Underwood, Emma Watson, Kim Kardashian, Anne Hathaway, Eva Longoria, and Halle Berry, just to name a few. Check out what their hairstyles are currently and keep looking to see what they will be. This website features a complete gallery of pictures for prom and wedding hairstyles!
Don’t forget to post your comments – tell us who is your favorite or which celebrities you would like to see more photos of!
Showing posts with label tips. Show all posts
Friday, July 15, 2011
2011 Hairstyle Trends
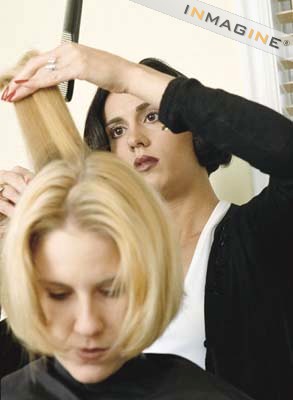
2011 is flying by, but are you staying up to date with the latest 2011 hairstyle trends? Check out the latest trends below for helpful tips, hairstyle photos and more!
A raging trend these days is scene hair, which is often confused with emo hair. Even though the scene subculture can be said to have evolved from the emo hairstyle trend, it now holds a place of its own and has distinct characteristics which differentiate it from emo hair.
Scene hair can be described as a fusion of emo and glam styles. While emo hair is comparatively bland and meant for minimal product use, scene hair is more in-your-face flamboyant, with lots of hair sprays, gels, jarring colors, bright dyes, extensions, straigtening, and so on. It also expresses a more upbeat personality in the wearer due to the colorfulness of the look.
Some of the hottest scene haircut trends seen in 2011 are the shy look (for longer hair which is set to flow in front of the face, covering part or most of it), the wild look (more layered, stacked, teased hair), and the shaggy look (hair chopped or styled on an angle for a perfectly imperfect effect). The most important part of scene hairstyles are the colors and accessories used for the finishing touches as these are the elements that showcase the wearers individual personality and unique style.
Scene hairstyles are not only popular among girls, but guys as well. While some may think it would be difficult to style guys’ short hair in a scene trend, it’s quite simple actually. Scene hair for males involves sharp lines and vivid colors and most importantly, longer hair. If your hair is short, grow it out, guys. The time it takes to get it the right length will be worth it if you’re into scene hairstyles. In the meantime, there are plenty of accessories out there (i.e. hats, caps, bandannas, etc.) to keep you from turning back from those awkward midway lengths.
It doesn’t matter if your hair is long, short, curly, straight, or somewhere in between all of that. When it comes to trying to find new things to do with it, it can be very easy to run short on ideas. Thankfully we have the runways and the catwalks during every fashion week to inspire us for new hairstyle ideas for 2011. Though it may seem that every model walking the walk has gorgeous voluminous hair, the truth is, hairstyles in every length, shape, and curl pattern grace the runways, and they give us plenty of ideas and inspiration to stay beautiful and fresh looking.
This year’s catwalks are no different, and while the fashion and clothing may be neutral and minimalist, the hairstyles are anything but. Where you will go simple with your every day ensemble styling, your hair is going to take an all new direction. Think big, think bold, and don’t be afraid to over do it. This year, if you want new hairstyle ideas for 2011, don’t be afraid to embellish. You may think your outfit won’t turn heads, but if you pair it with the right hairstyles, you definitely will. This year one of the hottest, and you’ll be happy to hear, easiest hairstyles of all will be the double hair knot. You saw this first in casual means with Britney Spears, as it seems to be her every day go to casual look. In 2011 you will take this casual look to an all new level that will be anything but casual.
Minimalist is the theme this year for trends, which is what makes the double hair knot so spectacular. It’s easy. And if you give it enough volume, it is anything but minimal. This is an almost effortless look that you can attain even on medium length hair. You can make this look a sleek updo for night, or muss it up and wear it casually for day. Either way, the end result is dead sexy, and dead easy.
1. First divide your dry and second day hair into three sections, making sure you maintain a side part. (to achieve the sleek nighttime look for the double knot, wash your hair and keep it wet, completing all of the same steps). The first section will be in the front, from your bangs towards your crown. The remaining two sections will be your sides, and the back.
2. Spritz it all over with a beachy sea salt spray, or if you don’t have that, an extra hold gel will do the same trick. With gel, less is more. Spritz a bit into your hair and then scrunch your hair to add some texture or waves.
3. Pull your front section back now, tease the underside just a smidge (no teasing if you are making this look sleek for night), and pull it to the side, on the opposite side of your part. The side part is one of the sexiest looks for 2011, and you want to maintain this look of “mystery”. You can pin this section behind your ear, or tie it together with one of your side sections.
4. For the last step, you are simply tying the remaining sections together into a knot. First tie your side and back sections into one knot that sits elegantly at the nape of your neck. If your side section that you pulled from the front is too long to keep tucked behind your ear, tie this section with your back section into the second knot. If you keep the side section pinned behind your ear, then you simply need to double knot the section you just knotted into…you got it, the double knot.
Scene Hairstyles 2011 Trend
A raging trend these days is scene hair, which is often confused with emo hair. Even though the scene subculture can be said to have evolved from the emo hairstyle trend, it now holds a place of its own and has distinct characteristics which differentiate it from emo hair. Scene hair can be described as a fusion of emo and glam styles. While emo hair is comparatively bland and meant for minimal product use, scene hair is more in-your-face flamboyant, with lots of hair sprays, gels, jarring colors, bright dyes, extensions, straigtening, and so on. It also expresses a more upbeat personality in the wearer due to the colorfulness of the look.
Some of the hottest scene haircut trends seen in 2011 are the shy look (for longer hair which is set to flow in front of the face, covering part or most of it), the wild look (more layered, stacked, teased hair), and the shaggy look (hair chopped or styled on an angle for a perfectly imperfect effect). The most important part of scene hairstyles are the colors and accessories used for the finishing touches as these are the elements that showcase the wearers individual personality and unique style.
Scene hairstyles are not only popular among girls, but guys as well. While some may think it would be difficult to style guys’ short hair in a scene trend, it’s quite simple actually. Scene hair for males involves sharp lines and vivid colors and most importantly, longer hair. If your hair is short, grow it out, guys. The time it takes to get it the right length will be worth it if you’re into scene hairstyles. In the meantime, there are plenty of accessories out there (i.e. hats, caps, bandannas, etc.) to keep you from turning back from those awkward midway lengths.
Latest 2011 Hairstyle Trend - The Double Hair Knot
It doesn’t matter if your hair is long, short, curly, straight, or somewhere in between all of that. When it comes to trying to find new things to do with it, it can be very easy to run short on ideas. Thankfully we have the runways and the catwalks during every fashion week to inspire us for new hairstyle ideas for 2011. Though it may seem that every model walking the walk has gorgeous voluminous hair, the truth is, hairstyles in every length, shape, and curl pattern grace the runways, and they give us plenty of ideas and inspiration to stay beautiful and fresh looking.This year’s catwalks are no different, and while the fashion and clothing may be neutral and minimalist, the hairstyles are anything but. Where you will go simple with your every day ensemble styling, your hair is going to take an all new direction. Think big, think bold, and don’t be afraid to over do it. This year, if you want new hairstyle ideas for 2011, don’t be afraid to embellish. You may think your outfit won’t turn heads, but if you pair it with the right hairstyles, you definitely will. This year one of the hottest, and you’ll be happy to hear, easiest hairstyles of all will be the double hair knot. You saw this first in casual means with Britney Spears, as it seems to be her every day go to casual look. In 2011 you will take this casual look to an all new level that will be anything but casual.
Minimalist is the theme this year for trends, which is what makes the double hair knot so spectacular. It’s easy. And if you give it enough volume, it is anything but minimal. This is an almost effortless look that you can attain even on medium length hair. You can make this look a sleek updo for night, or muss it up and wear it casually for day. Either way, the end result is dead sexy, and dead easy.
1. First divide your dry and second day hair into three sections, making sure you maintain a side part. (to achieve the sleek nighttime look for the double knot, wash your hair and keep it wet, completing all of the same steps). The first section will be in the front, from your bangs towards your crown. The remaining two sections will be your sides, and the back.
2. Spritz it all over with a beachy sea salt spray, or if you don’t have that, an extra hold gel will do the same trick. With gel, less is more. Spritz a bit into your hair and then scrunch your hair to add some texture or waves.
3. Pull your front section back now, tease the underside just a smidge (no teasing if you are making this look sleek for night), and pull it to the side, on the opposite side of your part. The side part is one of the sexiest looks for 2011, and you want to maintain this look of “mystery”. You can pin this section behind your ear, or tie it together with one of your side sections.
4. For the last step, you are simply tying the remaining sections together into a knot. First tie your side and back sections into one knot that sits elegantly at the nape of your neck. If your side section that you pulled from the front is too long to keep tucked behind your ear, tie this section with your back section into the second knot. If you keep the side section pinned behind your ear, then you simply need to double knot the section you just knotted into…you got it, the double knot.
Friday, July 1, 2011
Fashion Shoes :The best shoe stores online
Designer Shoes is one of the highest selling products in history and today, a designer shoe fashion industry is one of the largest and most lucrative pieces and the fashion industry and the sale of hundreds of thousands of pairs. Annual sales of this section, garment and fashion accessory industry, generating billions of dollars in revenue a year. Even in the current economic crisis, which is one of the most severe economic downturn that the generation of people have ever seen, after the site’s designer shoe sales records from quarter to quarter, and year after year, such as women’s shoes in shoe stores to buy not know how quickly they can get. prices of designer shoes seem to either not dampener on sales of products, like today, the average pair of designer shoes for women of any brand that is even half decent, or have some sort of of Fame, which sold hundreds of dollars. Designer shoes with price tags of the four figures are becoming the norm, as it seems that nobody is hitting the eyelid at the idea of paying thousands of dollars or more pairs of shoes at high street shoe shops in the world. Why then is it still very difficult for a woman to find a great pair of shoes to your local shoe stores? Why is it so difficult to get a great pair of shoes when you go to the store? Or they do not want to style or color you are looking for, or even if they are doing and you will end up a perfect pair of shoes, you are usually disappointed that they have your size. Is there any way easier and better to buy shoes, and several other shopping these days, it is the internet. Online shoe stores great pricing that can not be matched to local shops and they also have a wider than any shop you have ever seen with shoes of all sizes to be readily available.
Inihapusaja shoe store is the best shoe shops on the internet, go http://www.ministryoffashion.co.uk/
Friday, June 24, 2011
Hair and Make-Up Tips For a Bikini Model
Depending on the photo shoot, your hair and make-up can range from bare and flat, to colorful and volumized. You want to deliver the best results as a model, and that includes knowing what is right and what is wrong for each type of photo shoot. As a model you should know the necessary tools and tips for your hair and make-up. For a bikini model, the best approach to your hair and make-up is to keep your look clean, fresh and simple.
You want to look sexy yet natural as a bikini model, so your make-up should be minimized. You should use only a little of foundation, think fresh and light. Remember, you could be getting wet as a bikini model, so do not use so much that your make-up will run. For your blush, you should pick a dark shade of pink, but not so dark that it appears unnatural. When you brush it on your cheeks, you'll want to work from your cheekbones to your ears in an upward sweep. This will enhance the contour of your face and highlight your cheek bones.
Since your eyes are considered to be "windows to your soul", your eyes are an essential piece of the puzzle. For your eye shadow, you should pick a light color that compliments your eyes, steering towards browns and grays. Although color is good, it can be problematic during a bikini shoot. Usually the purpose of a bikini shoot is to sell the bikini. You want the consumer to look at how great your body looks in the bikini and how great your overall look is. You do not want them just to concentrate on your eyes; it takes away attention from your body and the swimsuit.
For your mascara, it should be light. You want to accentuate your eyelashes, but be careful not to make them "show stopper" eyelashes. If you were on the beach you wouldn't see a woman in a bikini with false eyelashes. So a simple mascara will do great, do not use volumizers or eyelash plumpers. For your eyeliner, you should use your eye shadow. Just dip your brush in your eye shadow, usually the darker of the colors you've used, and brush it along the bottom eyelid, and on the edge of your eye. This will play up your eyes without making them too harsh, as eyeliner has a tendency to do.
You want your lips to look plump and beautifully shaped for your photo shoot. Choose a lip liner that is very close to your lip color. When applying the lip liner, work your way from the inside of your lips to the edges. Edging your lips is crucial in creating a plump pouty lip. Now for your lipstick you should pick a sheer color, within 2 shades of your lip color. Pick a lipstick that has a little bit of moisture and shine to it. Before you apply the lipstick, you should put some ChapStick on your lips. This will hydrate your lips, helping to keep them looking healthy and moisturized. Apply your lipstick, working from the inside of your lips to the edges. Do not use gloss for a bikini shoot, you want your lips to look moisturized and natural, not glossy and fake. After you have applied your lipstick, take the edge of your pinky, and edge up your cupids bow. This will define your lips and create that voluptuous look.
When it comes to your hair, you want to have that slightly curly and the "next-day" messy look. To get the tousled look, you want your waves to appear silky, you can achieve this by applying a dime size amount of smoothing serum through your dry hair before you style your hair. Use a 2" curling iron, and loosely curl your hair and lightly tease your hair at the roots. You just want to create the wispy vibe, not full on curls. For the next-day messy look, there are two tips you can use to get the results you need. Take a shower right before you go to bed and comb your hair out to detangle it.
After you have done this, you can part your hair in the center of your head, and pull your hair back into a low bun and go to sleep. When you wake up and take down your hair, you will have relaxed and refined waves. Another way is to spray texturizer onto your dry hair. After you applied the texturizer, scrunch up your ends to help build messy volume. Once you have styled your hair, make sure you spray your hair with a flexible hairspray. You want to maintain the wispy look without sacrificing its naturalness. If you have difficulty thinking of how to do your hair, just glance inside a Victoria's Secret catalog to get a push in the right direction.
When you have problems trying to create the perfect bikini model look, think of the beach. Close your eyes and envision the beach, imagine you're walking on the beach, feel the sand beneath your feet. Notice the people as you walk by them. Do they wear bright lipstick colors? Do they have a crazy eye shadow color on? Simply think of how you would go to the beach if you were with friends or by yourself. You want to create the feeling of being on the beach or by the pool.
You want the consumer to imagine that that's how they can look in the bikini. If you have big curls in your hair and bright red lips, it will be harder for people to imagine themselves as you. The purpose of a bikini model, other than selling the swimsuit, is to make the consumer want to be you. They want to look as sexy as you do on the beach or while laying by the pool. Remember you want to look sexy but RELATABLE! Do this and you will achieve that sexy beach look, and have an amazing shoot.
Brian Cannone went into promoting fitness with enthusiasm and a very genuine love for the sport. His approach and feelings about bodybuilding are that it is not only a sport but more of a way to motivate yourself and others to achieve results of loosing body-fat and gaining lean muscle along with improving overall health. By competing in natural bodybuilding you push yourself to be in your best possible shape of your life. In fact, he believes that it is more about the results you gain then the trophy you may take home with you. With fitness results in mind Brian trained nearly every competitor that competed in the Milford County and Mr. and Ms. Connecticut events, most of these new bodybuilders then competed for their first time and they were overwhelmed with their accomplishments. This is a sport that the contestants can't loose for it is their physique that is the trophy and the process of getting into great shape that is the reward.
Friday, June 10, 2011
Messy Updo
A sexy, messy updo is the perfect style for a hot summer day when you want to keep your hair out of your face and still look amazing. It’s fast and easy to do, and great for those bad hair days.
Wash your hair with a hydrating shampoo and conditioner. Towel dry your hair. Scrunch a curl enhancing mousse into damp hair and let it air dry.
Gather your hair into a low, loose ponytail. Don’t pull your hair all the way through the elastic the last time you wrap it around; you want to form a loop.
Leave a few face framing pieces and curl them just a little bit. Spray your hair with an anti-frizz and set with a light, aerosol hairspray.
Messy Updos- Boho Braids
One of the hottest trends this summer will be the very cute, very elegant and easy to do, boho braids. A boho braid is a side swept single braid that gives your coif a little edge. Boho braids work on anyone with medium to long hair. It doesn’t work that well on short hair because the braid needs to be swept across to one side and go behind the ear.
A boho braid can be included in any messy updos, including natural, soft waves, or just a messy bun. To get the messy updo with the boho braid, start by spritzing your hair with a shine enhancer after you’ve washed it.
Get a dime-sized amount of gel or mousse and scrunch your hair with your hands. Flip your hair over for even more volume, and blow dry.
Take a 2-4 inch piece of hair right at the front (see picture) and braid it across to the other side. Make sure you braid it all the way to the end. Pin the braid behind the ear, and you’re all set. Boho braids are great for the summer because they keep the hair out of your face, as well as giving you a chic and elegant do that you can wear anytime during the day.
Thursday, June 9, 2011
Tips for Healthy, Shiny Hair
Great hair doesn’t have to cost a fortune. You don’t need to spend money on expensive high-end products, or even go to the salon every month. All it takes is a little TLC to get your hair back to its natural health and shine.
Preventive Care: Don’t let your hair be a victim to the environment. Protect it by deep conditioning once a week or using a hair mask. This will fortify your strands, making them much healthier and easier to manage. So treat your hair to some spa time every week and within a month, you’ll definitely see a difference!
Skip the Heat: I cannot tell you how important it is that you skip the blowdrier/straightener/curler as much as possible! On your days off where you’re not leaving the house for example, why not let your hair air dry to its natural state? The more heat you put on your hair, the more you dry out the strands, leaving your hair weak, brittle, and not very healthy. If you must blowdry every day, make sure you do it at the lowest heat setting possible. Yes, it does take a little longer, but especially for those with thin hair like mine, it can make a world of difference! Also, don’t forget that ceramic irons are much more gentler on your hair than non-ceramic ones, so be sure you use the best kind.
Don’t rub! After getting out of the shower, PAT your hair dry and then wrap it in a towel. But under no circumstance should you rub your hair dry since that causes breakage which will eventually lead to split ends.
Brush With Care: The way you brush your hair is very crucial to its health. Never pull on it too hard – you’ll end up pulling out strands! If your hair gets easily tangled, brush it slowly and with care starting at the ends and working your way up – especially if your hair is wet.
Skip a Day: One of the best advices I was given by my hairdresser was to not wash my hair every day. Sure, it may sound a little gross, but washing your hair every single day strips it of its natural oils, which leaves your hair dry and brittle. Instead, wash your hair every other day to retain essential oils.
Tip #1
Preventive Care: Don’t let your hair be a victim to the environment. Protect it by deep conditioning once a week or using a hair mask. This will fortify your strands, making them much healthier and easier to manage. So treat your hair to some spa time every week and within a month, you’ll definitely see a difference!
Tip #2
Skip the Heat: I cannot tell you how important it is that you skip the blowdrier/straightener/curler as much as possible! On your days off where you’re not leaving the house for example, why not let your hair air dry to its natural state? The more heat you put on your hair, the more you dry out the strands, leaving your hair weak, brittle, and not very healthy. If you must blowdry every day, make sure you do it at the lowest heat setting possible. Yes, it does take a little longer, but especially for those with thin hair like mine, it can make a world of difference! Also, don’t forget that ceramic irons are much more gentler on your hair than non-ceramic ones, so be sure you use the best kind.
Tip #3
Don’t rub! After getting out of the shower, PAT your hair dry and then wrap it in a towel. But under no circumstance should you rub your hair dry since that causes breakage which will eventually lead to split ends.
Tip #4
Brush With Care: The way you brush your hair is very crucial to its health. Never pull on it too hard – you’ll end up pulling out strands! If your hair gets easily tangled, brush it slowly and with care starting at the ends and working your way up – especially if your hair is wet.
Tip #5
Skip a Day: One of the best advices I was given by my hairdresser was to not wash my hair every day. Sure, it may sound a little gross, but washing your hair every single day strips it of its natural oils, which leaves your hair dry and brittle. Instead, wash your hair every other day to retain essential oils.
How to do a French Braid
If you didn’t already know, braids are one of the hottest hairstyles this summer and for good reason too! They keep the hair out of your hair on those hot, humid days, they’re easy to maintain, and oh yeah they look super cute! There are tons of different ways to braid your hair and all of them are good, but I find that french braids are super classy and look amazing on anyone. Granted, they’re a little hard to pull off, but all you need is a little bit of patience and voila, you can have a beautiful french braid in no time. So here is your step-by-step guide to doing a french braid.
Step 1:
Start with clean hair and brush out any knots or tangles. Brush your hair back so that there is no part. Apply a frizz serum to your palms and run through hair to make sure there are no flyaways.
Step 2:
Take a part of your hair and separate it from the rest of your hair where you want to start your braid. It is best to make the part V-shaped, with the point of the V towards the back of your head. I find that this is easiest, but you can also start lower on the head or even on the side. If you’re a beginner though, just stick to these steps.
Step 3:
Now that you’ve gathered that section of hair, separate it into three parts just like you would a regular braid.
Step 4:
Now this is where it gets a little trickier, but if you know how to do a normal braid, it shouldn’t be too hard at all. Hold the left strand with your left pinkie while moving the right strand from your right hand to your left. Shift the new right strand (which was the middle strand) from your right hand to your left.
Step 5:
Add some hair from the right side of your head to the right strand. Use your right index finger to pick up a section of hair from the right side of the head and add it to the new rightmost strand.
Step 6:
Cross the left strand over the middle strand. Grab the rightmost strand with your right pinkie then rotate your left hand so that you can grab the leftmost strand in your right hand. Shift the new leftmost strand to your right hand.
Step 7:
Add hair from the left side of the head to the new leftmost strand. Use your left index finger to pick up a section of hair from the left side of the head and add it to the leftmost strand.
Step 8:
Cross the right strand over the middle strand. Grab the left strand with your left pinkie and rotate your right hand so that you can grab the rightmost strand in your left hand. Shift the new rightmost strand to your left hand.
Step 9:
Add some hair from the right side of your head to the rightmost strand. Use your right index finger to pick up a section of hair from the right side of the head. Add it to the rightmost strand which is currently held in your left hand.
Step 10:
Cross the left strand over to the middle strand. Grab the right strand with your right pinkie then rotate your left hand so that you can grab the leftmost part of your hair in your right hand. Shift the new leftmore strand from your left hand to your right hand.
Step 11:
Add some hair from the left side to the leftmost strand. Use your left index finger to pick up a section of hair from the left side of the head and add it to the leftmost strand in your right hand.
Step 12:
Continue braiding and cross the rightmost strand over the middle. Add hair to the new rightmost strand, cross the leftmost strand over the middle, add hair to the new leftmost strand, and repeat until there is no hair left to braid.
Step 13:
Braid the rest of your hair normally until there is no more hair left. Tie or clip the braid and ta-da! Easy as pie! Okay, so maybe it doesn’t sound very easy, but if you take the time and follow the steps along with a little bit of patience, I promise you you’ll be able to french braid your hair in no time
Tuesday, June 7, 2011
How to Determine Your Face Shape
Almost everything you read in a magazine or anywhere else, asks you to determine your face shape in order to determine which hair style looks good on you, which colors, etc. For the longest time, I couldn’t figure out my face shape no matter how hard I tried! I wasn’t sure if it was oval or diamond shaped, so I decided to figure out exactly what each face shape entitled. So here is a little glossary on the different type of face shapes. Hope it helps
Oval face shape
Curvilinear shape. Length is equal to one and a half times width, with forehead and jaw the same width. So think of the oval face shape as an egg.
Round face shape
Circular shaped. Length is approx equal to width.
Oblong face shape
Face is longer than it is wide with a long straight cheek line.
Sqare face shape
Strong and broad forehead with angular jaw.
Heart face shape
Wide at the forehead and cheekbones, narrow at the jawline.
Diamond face shape
Forehead and jawline are narrow with wide and high cheekbones.
Triangular face shape
Forehead and cheekbones are narrow with a wide jawline.
Saturday, June 4, 2011
The Perfect Makeup for Your Hair Color
You’ve probably noticed that not all makeup colors look good on you and that’s probably because the colors might not match your skin tone as well as your hair color. So take out your notepads and start taking notes! These pro makeup tips will ensure that you look your very best every single time. It’s as simple as following the color rules!
Brunettes know that it’s easy for their complexions to get lost and washed out since dark hair causes more contrast with their skin. Brunet absorbs a lot more light and so your skin might not get the chance to shine itself. To fix this problem, pick light-reflecting peaches and corals to brighten up your skin as well as give it a soft, warm, glow.
If you’re a blonde, you know that it can be hard to wear bright or dramatic colors. Anything bold seems that much harsher on a blonde and that’s why it’s important to work with what you have. Incorporate soft, muted colors into your makeup bag such as pale pinks, nudes, and burgundy’s. Avoid going overboard as you’ll just end up looking overdone. If you’re looking for an extra kick, line your upper lids with a sparkly black liner.
Redheads have a hard time picking out their colors simply because of the harsh contrast between their pale skin tone and the fiery red hair.But the same can go for those with dyed red hair too. The undertones in the hair and cosmetic colors absolutely need to match. Obviously the lighter you are, the softer the colors should be. If you have auburn highlights you should probably get rid of cool shades and go for warmer tones such as tawny, champagne and even gray.
Top 10 Beauty Myths
There is so much information out there on pretty much anything, but you also can’t believe everything you hear or read. Especially when it comes to beauty, there are a lot of weird do’s and dont’s out there that aren’t always necessarily true. So I’ve uncovered the top 10 beauty myths out there which should help you get a better idea of what’s true and what isn’t.
MYTH #1: RUBBING LEMON ON YOUR TEETH WILL GIVE YOU PEARLY WHITES
This actually does work, but it comes with a price. While lemons do help you get lighter locks, they don’t really work on your teeth since the citric acid in lemons wears away enamel. Save the lemons for the lemonade and instead brush your teeth with water and baking soda a couple times a week to get those pearly whites at home.
MYTH #2: FAKE NAILS WILL DESTROY YOUR REAL NAILS
Not true. It is not the artificial nail or the glue that ultimately causes nail damage, but improper removal—such as picking or prying off. So if you just take care of your nails and remove them properly, there will be absolutely no damage to your nails.
MYTH #3: LASER HAIR REMOVAL DOES NOT WORK FOR LIGHT HAIR
Who came up with that? Either way, it’s not true. Although laser hair removal does work better for darker hair, lighter does works just as fine. With lighter hair, you’ll see about 70-80% removal of the hair. So just go one extra time and you’ll be fine!
MYTH #4: YOU NEED FREQUENT HAIRCUTS IF YOU WANT YOUR HAIR TO GROW
LONGER
Wrong again. Your hair will grow at the same speed with or without a haircut. But regular haircuts will help improve the overall health of your hair as well as getting rid of those pesky split ends.
MYTH #5: PETITE GIRLS CAN’T PULL OF LINGERIE
Another stupid myth made up by guys who like big-chested girls. There are so many different types of lingerie out there made for every body, including petite. So next time you wanna surprise your man but you think you won’t be able to pull it off, just go out and find a nice up-lifting water bra and it’ll do the job!
MYTH #6: BREAKOUTS ARE CAUSED BY OILY SKIN
Although breakouts are associated with oily skin, that is not always the cause. In most cases, breakouts happen because the skin is so sensitive that you might be using the wrong products, therefore causing more pimples. So if you have oily skin and you’ve tried everything, try sensitive formulas and you’ll start seeing some change.
MYTH #7: ORGANIC PRODUCTS ARE WEAK
Whoever made that up is seriously disturbed because organic beauty products are the best you can get! They’re skin friendly so they won’t clog your pores and they protect your skin from all the harmful pollutants out there. Plus, you don’t get all the chemicals so organic beauty products is really the way to go.
MYTH #8: YOU CAN’T PULL OFF ALL COLORS
If there is one thing I always hear from my girlfriends is that ‘I can’t wear THAT color!’, which is absolutely ridiculous. The one thing you have to pay special attention to is the shades of the color as well as the undertones. So while a hot, fiery red might not suit your complexion, a toned-down version might do you wonders!
MYTH #9: CHLORINE TURNS YOUR HAIR GREEN
So not true. Copper, not chlorine, will turn your hair green. If a pool is not properly maintained and cleaned regulary, it can have copper residue which in turn could turn your hair a greenish color. Now this is mostly for blondes since their pigment is so light, but all you have to do is switch to a low pH shampoo which will help combat against greening.
MYTH #10: CROSSING YOUR LEGS WILL GIVE YOU SPIDER VEINS
Very untrue. Most people that hair spider veins or vericosse veins have them because either their mother or grandmother had them. It’s all in the genes!The Maxi Dress- A Summer Staple
Maxi dresses are making a big comeback this summer, and it’s clear since even celebs seem to be loving this flowy, girly trend. Maxi dresses were a big hit two seasons ago, and now they’re making a comeback like never before.
So how do you wear a maxi dress and when is an appropriate time to pull one off? Take a cue from the stars who are seen wearing them mostly during the day.
Maxi dresses are the perfect summer staple since they’re light, flowy, and best of all long (so you can skip shaving your legs that day!).
I love these dresses because they’re so versatile. You can pair them with wedges, sandals, or flip-flops and they’ll still make a big statement. And since they’re so popular this season, you’ll have no problem finding one…or two.
When choosing a maxi dress, opt for a colorful, printed pattern as well as an empire waist style to cinch you in for a slimmer effect.
So whether you go for a plunging neckline maxi, a strapless one, or a super frilly ruffled maxi dress, the choice is all yours. Take a cue from these celebs and get inspired with your own style!
Thursday, June 2, 2011
How to Grow Out Your Bangs
So you got bangs, but now you’re kinda sick of them right? Well you might be thinking : ” Great! Now I have to wait months and months for them to grow out!” Not true! There are actually specific things you can do to grow out your bangs faster than you ever thought! Plus, bangs are so last season! Celebs are now trading in their bangs for loose updos and longer, side-swept bangs. Here’s how
Buy a stretchy hairband. Getting a chic, fashionable hairband is a great idea because it can be worn at any stage of the regrowth process. Put it right at your hairline, or push it back a little further to grab and hold any strays.
Use hairspray. Using hairspray will keep your bangs back as well as any flyaways. So if you’re sick of having them in your face, use some bobby pins to pin back the hair and follow up with some hairspray.
Do different parts. You can always experiment with different parts, which is probably the best way to grow out your bangs. You can divide your bangs right down the middle and use bobby pins to make them stay put, or use some gel to slick them straight back off the forehead for a chic, no-part look.
Be patient. Although these tips will keep your hair away from your forehead and speed the growth process, it will still take time. If you just got bangs and you’re already thinking about trading them in, wait for about 3 weeks, after which the hair will be more easier to style.
How to Wear Jeggings
With the return of super skinny jeans and leggings this past couple of years, it’s no wonder the jeggings were invented. Jeggings are basically exremely skinny jeans that look like leggings and are also worn like leggings.
I have to say that in the beginning I was not a fan of the skinny jean or the legging, but as time went on, I came to embrace both, and now, it seems like I can’t even wear any other types of jeans but skinny. The problem with these slim types of bottoms is that they’re hard to dress. And jeggings especially, can be a little tricky.
A Few Thumb Rules
First off, make sure jeggings suit your body type. If you don’t feel comfortable in them, don’t wear them – no one’s going to shun you for it!! Second, pick a dark pair that will go with everything from a basic tank to a sweater dress. Also, black slims you down so that’s always a plus. If you’re on the short side, you may want to get a petite pair as a regular pair of jeggings might run a little too long, and there’s nothing worse than 2 feet of bunched up jeans at the bottom.
So What Exactly Can You Wear Jeggings With?
Jeggings are actually quite versatile, and I feel they do a better job than skinny jeans or leggings would. Because they’re still denim material, you don’t have to cover your butt, but they’re so slim and skin-tight like leggings that you can wear a long sweater or tee, a dress, or just throw a long cardigan over.
I love wearing leggings with a pair of chunky heels, a long sweater and a scarf. Add a big tote to that, and you’re set for the day. So if you’re heading to the mall this week, make sure to pick up a pair of jeggings: it’s all you’ll need!
Monday, May 30, 2011
The Perfect Swimsuit for Your Figure
We can’t all wear the same style swimsuits because unfortunately, we all have different shaped bodies. And as much as I would love to pull off some sexy, exotic swimsuits I see on the runways, I have to come to terms that I am not that tall, nor that skinny – so I have to find a swimsuit that fits my shape, not someone elses. Keep reading to see which swimsuit best suits your figure!
Problem #1: Small Bust
We’re not all blessed with a bountiful bust, so we have to make do with whatever we have. To hide a small bust, wear swimsuits with padding (just make sure they look ok once you get wet!), ruffles to add more volume, and prints to distract from the problem area. Also, make sure the colors work in your favor too! Pair a dark bottom with a bright top to make it work.
Problem #2: Large Bust
If you find that you’re spilling out everywhere, you may need to rethink your swimsuit. Did you know that swimsuits actually run 2 sizes smaller than regular clothing? So with that in mind, choose a swimsuit with a built-in bra or an underwire to avoid spillage. Stay away from bandeaus, keyhole, string bikinis and demi-bra styles.
Problem #3: Belly Bulge
One of the most common swimsuit problems is the belly bulge. Choose a plunging-halter suit which will draw the attention away from the bulge. You can also go with something that has a pattern or some sort of detail at the mid-section to draw the eye away. You can also look for swimsuits with built-up tummy control as well as tankinis. But just stay away from the bikinis.
Problem #4: Thick Thighs
To hide thick thighs, go for swimsuits with a high cut on the leg, which will make your legs look longer and slim your thighs. Also, stay away from shorts as they actually tend to make your thighs and butt look bigger. Instead, draw the attention away with a colorful or embelished top. Also, you can mix your bikini pieces by putting the darkest on the bottom and the lighter color on top.
By: http://styletips101.com/
Fashion Tip: How to Avoid Dragging Your Pants
When buying a pair of dress pants, you’re always stuck with the dilemma of weather you should get shorter or longer pants. Shorter, so you can wear them with your flats, or longer, if you wear them with heels.
Zakkerz are magnetic strips you can use to create a temporary hem when switching from heels to flat shoes.
Just roll your pants up to the desired length and attach two strips to each pant leg. The handy Zakkerz keep the new hemline in place until you’re ready to switch to heels again.
By: http://styletips101.com/
Subscribe to:
Posts (Atom)


